Selamat datang di blog saya, saya menyediakan berbagai tips maupun info tentang internet maupun pelajaran, terima kasih atas kunjungannya dan maaf blog ini tersedia hanya pelajaran saya saja, Welcome to my blog, I provide a variety of tips and info on the internet as well as lessons, thanks for visiting and sorry this blog is available only lesson I have 1
Get Gifs at CodemySpace.com
Subscribe:

Subscribe Now: poweredby

Powered by FeedBurner

Wednesday, 16 January 2013

Nama dalam berbagai bahasa

Maksud dari postingan ini adalah untuk mengetahui namamu dalam berbagai bahasa, seperti Jepang, Korea, Italia bahkan nama klan vampiermu. Sobat juga dapat meramal pekerjaan masa depan sobat hanya dengan memasukkan nama asli sobat, tapi ini jangan dianggap serius ya :) Jika sobat tertarik ingin mengetahui nama-nama sobat dalam berbagai bahasa? sobat dapat mencoba menggunakan jasa situs name generator berikut ini.

Berikut List Website Name Generator:

1. Japanese Name Generator
Kunjungi website ini untuk mengetahui namamu dalam bahasa Jepang.

2. Korean Name Generator
Kunjungi website ini untuk mengetahui namamu dalam bahasa Korea.

3. Italiano Name Generator
Kunjungi website ini untuk mengetahui namamu dalam bahasa Italia.

4. Dragon Name Generator
Kunjungi website ini untuk mengetahui nama nagamu.

5. Witch Name Generator
Kunjungi website ini untuk mengetahui nama penyihirmu.

6. Vampire Name Generator
Kunjungi website ini untuk mengetahui nama vampirmu.

7. Gelar Kaskuser Generator
Kunjungi website ini untuk mengetahui gelar kaskusmu dari nama id kaskusmu.

8. Ramal Pekerjaan
Kunjungi website ini untuk meramal pekerjaanmu melalui namamu.

Nah, silahkan sobat kunjungi situs-situs diatas untuk mengetahui nama sobat dalam berbagai versi.
Semoga berguna dan bermamfaat...
READ MORE - Nama dalam berbagai bahasa

sms gratis Via internet

sebuah situs http://www.ayosms.in/ telah menyediakan fitur SMS gratis secara online. Situs ini dapat mengirim SMS secara massal atau 1 SMS ke banyak nomor sekaligus.

That Script:
<script language="javascript" src="http://www.ayosms.in/sms.js" type="text/javascript">
</script>
READ MORE - sms gratis Via internet

Tuesday, 15 January 2013

Text Modification Characters & Tags

Just as any word processor has commands which modify the appearance and structure of text, so HTML has many such commands.  Without such modifying tags, the text would be merely a string of ASCII characters with no breaks and with no more than one space between any two words.  (ASCII, or American Standard Code for Information Interchange, is a standardized code in which characters are represented for computer storage and transmission by certain numbers.)
To see lists of special characters which can be inserted into HTML source code documents, go to Special HTML Characters, Special ALT Characters, and Special <Font Face="Symbol"> Characters.  For special HTML characters, either the HTML code or the character code (if any) may be used.  For special ALT characters, the Alt key on the keyboard must remain depressed while a sequence of numbers on the numeric section of the keyboard is typed.  (The Num Lock key must be depressed to activate the numeric keys.)  Many special HTML characters and special ALT characters are the same.
Web browsers do not detect carriage returns (line breaks), tabs, extra spaces, nor other white space embedded in an HTML source code document.  For instance, even if 10 spaces are present between two words in a source document:
On his powerful motorcycle, the daring thrill-seeker jumped up and over the river gorge /          \ and safely down to the other side. only 1 space between those two words will be displayed on a browser: On his powerful motorcycle, the daring thrill-seeker jumped up and over the river gorge / \ and safely down to the other side. Often, however, it is desirable to have multiple spaces between words—for instance, 2 spaces between sentences, which is the standard in most books.  To accomplish this, an invisible “hard space” or “non-breaking space” character may be used:
  • &nbsp;: inserts a single, non-breaking space where there otherwise would not be a space.
Here, although 2 spaces have been typed between these sentences in the source code:
Chris' homepage was awesome.  I liked Andrea's even better, though. only 1 space will be recognized by the browser: Chris' homepage was awesome. I liked Andrea's even better, though. However, by inserting a &nbsp; character immediately after the first sentence in the source code: Chris' homepage was awesome.&nbsp; I liked Andrea's even better, though. then 2 spaces between the sentences will appear on the browser: Chris' homepage was awesome.  I liked Andrea's even better, though.
Frequently, it is desirable to cause a break in a sequence of words or phrases at one or more places, since web browsers do not recognize carriage returns (regular line breaks).  This can be done easily by inserting a “break” tag:
  • <BR>: forces a line break at that point, causing the text after the break to be displaced down one line.
For instance, without break tags, the following:
These are the five major structures of the eye, from front to back:
cornea
iris
crystalline lens
vitreous humor
retina.
would appear on a browser as: These are the five major structures of the eye, from front to back: cornea iris crystalline lens vitreous humor retina. With the proper break tags, however, this: These are the five major structures of the eye, from front to back:<BR>cornea<BR>iris<BR>crystalline lens<BR>vitreous humor<BR>retina. or this: These are the five major structures of the eye, from front to back:<BR>
cornea<BR>
iris<BR>
crystalline lens<BR>
vitreous humor<BR>
retina.
becomes this: These are the five major structures of the eye, from front to back:
cornea
iris
crystalline lens
vitreous humor
retina.

Sometimes, it is desirable for a group of words or characters to remain altogether on the same line rather than to be interrupted at the end of the line and continued onto the next line.  One way to keep all of these words or characters together on the same line is to insert a &nbsp; character, instead of a regular space, between each word or character in the group.  However, especially if the cluster of words or characters is lengthy, there is an easier way to do this—by surrounding the phrase with a pair of “no-break” tags:
  • <NOBR>string of words and/or characters</NOBR>: forces the words and/or characters between the tags not to break, even at the end of a line, but rather to remain altogether on the same line.
For instance, without no-break tags, the mathematical equation in this source code sentence:
The next test question read, "Write an equation for a right triangle." Doug thought for a moment and then wrote a² + b² = c². might be broken at the end of the line on a web browser: The next test question read, "Write an equation for a right triangle." Doug thought for a moment and then wrote a² + b²
= c².
However, typing the sentence in the source code with no-break tags like this: The next test question read, "Write an equation for a right triangle." Doug thought for a moment and then wrote <NOBR>a² + b² = c².</NOBR> will cause the equation to be displayed without breaks like this: The next test question read, "Write an equation for a right triangle." Doug thought for a moment and then wrote
a² + b² = c².

Rarely, within a no-break (<NOBR>/</NOBR>) section, there may be a place where it is permissible for the text to break and continue onto the next line.  In such a case, a “word break” tag may be used:
  • <WBR>: notifies the browser that, at that location, the text in a no-break section may be broken if the end of a line is reached before the no-break section has been completed.  A line break is not forced at a <WBR> tag (a <BR> tag does that); rather, it lets a browser know where a line break is allowed, if needed. Note:  Some browsers do not recognize <WBR> tags.

Since web browsers ignore carriage returns (lines breaks) and tabs, then HTML source code text must include “paragraph” tags to create proper spacing between paragraphs:
  • <P>paragraph</P>: defines the boundaries of a paragraph.  A line break automatically is inserted before and after a paragraph.  Also, a line space automatically is inserted before a <P> tag and after a </P> tag (that is, an entire line is skipped between a paragraph and any text before and after it).  When a </P> tag ends a paragraph and a <P> tag begins the paragraph following it, only one line space is inserted between the paragraphs.  Many browsers recognize only the <P> paragraph tag, and this really is the only tag required to separate paragraphs.  However, it is a good habit in HTML word processing to end each paragraph with the </P> tag.  This makes proofreading an HTML source code much easier. Note:  A <P> tag has the same effect as two <BR> tags.
With no paragraph tags in the HTML source code (but with &nbsp; characters between sentences), these 3 paragraphs: There are two principal structures of the eye which refract or focus light entering the eye: the cornea and the crystalline lens.&nbsp; The cornea is the clear dome at the front of the eye.&nbsp; The front surface of the cornea is convex, while the back surface is concave.&nbsp; The shape of the cornea does not change in focusing.

On the other hand, the crystalline lens is located directly behind the iris (colored part) of the eye.&nbsp; Light passes through the pupil (hole in the iris) to reach the lens.&nbsp; Both the front and back surfaces of the crystalline lens are convex.&nbsp; The lens expands and contracts to focus light coming from objects at different distances away from the eye.

The eye's lens readily absorbs ultraviolet light from the sun.&nbsp; After years of exposure, a cloudy or opaque "cataract" eventually may develop in the lens, resulting in diminished vision.
would appear like this: There are two principal structures of the eye which refract or focus light entering the eye: the cornea and the crystalline lens.  The cornea is the clear dome at the front of the eye.  The front surface of the cornea is convex, while the back surface is concave.  The shape of the cornea does not change in focusing. On the other hand, the crystalline lens is located directly behind the iris (colored part) of the eye.  Light passes through the pupil (hole in the iris) to reach the lens.  Both the front and back surfaces of the crystalline lens are convex.  The lens expands and contracts to focus light coming from objects at different distances away from the eye. The eye's lens readily absorbs ultraviolet light from the sun.  After years of exposure, a cloudy or opaque "cataract" eventually may develop in the lens, resulting in diminished vision. The proper insertion of paragraph tags into the same 3 paragraphs: <P>There are two principal structures of the eye which refract or focus light entering the eye: the cornea and the crystalline lens.&nbsp; The cornea is the clear dome at the front of the eye.&nbsp; The front surface of the cornea is convex, while the back surface is concave.&nbsp; The shape of the cornea does not change in focusing.</P>

<P>On the other hand, the crystalline lens is located directly behind the iris (colored part) of the eye.&nbsp; Light passes through the pupil (hole in the iris) to reach the lens.&nbsp; Both the front and back surfaces of the crystalline lens are convex.&nbsp; The lens expands and contracts to focus light coming from objects at different distances away from the eye.</P>

<P>The eye's lens readily absorbs ultraviolet light from the sun.&nbsp; After years of exposure, a cloudy or opaque "cataract" eventually may develop in the lens, resulting in diminished vision.</P>
would cause them to be displayed correctly on a web browser as: There are two principal structures of the eye which refract or focus light entering the eye: the cornea and the crystalline lens.  The cornea is the clear dome at the front of the eye.  The front surface of the cornea is convex, while the back surface is concave.  The shape of the cornea does not change in focusing.
On the other hand, the crystalline lens is located directly behind the iris (colored part) of the eye.  Light passes through the pupil (hole in the iris) to reach the lens.  Both the front and back surfaces of the crystalline lens are convex.  The lens expands and contracts to focus light coming from objects at different distances away from the eye.
The eye's lens readily absorbs ultraviolet light from the sun.  After years of exposure, a cloudy or opaque "cataract" eventually may develop in the lens, resulting in diminished vision.
Note:  The line spaces inserted between paragraphs in the source code are ignored by a browser and could be eliminated, giving the same marked up result.  However, for ease of proofreading the source code, it is good practice to insert them.
The <P> tag may contain within it an alignment parameter as part of the command:
  • ALIGN="LEFT"|"CENTER"|"RIGHT"|"JUSTIFY": positions the lines of the paragraph at a specific location on the page.    "LEFT" (the default) aligns each line of text with the left margin of the page.
       "CENTER" centers each line of text horizontally on the page.
       "RIGHT" aligns each line of text with the right margin of the page.
       "JUSTIFY" aligns each line of text with both the left and right margins of the page, creating non-uniform spacing between words.
    Note:  Many browsers do not recognize the "JUSTIFY" value and treat it the same as a "LEFT" value.
The following short poem I composed, with 3 different alignment parameters: <H3 ALIGN="LEFT">High Flying</H3>
<P ALIGN="LEFT">I gazed down into valleys,<BR>
At the snowcaps white as cream,<BR>
Then soared above the puffy clouds&#151;<BR>
Too bad it was a dream!</P>


<H3 ALIGN="CENTER">High Flying</H3>
<P ALIGN="CENTER">I gazed down into valleys,<BR>
At the snowcaps white as cream,<BR>
Then soared above the puffy clouds&#151;<BR>
Too bad it was a dream!</P>


<H3 ALIGN="RIGHT">High Flying</H3>
<P ALIGN="RIGHT">I gazed down into valleys,<BR>
At the snowcaps white as cream,<BR>
Then soared above the puffy clouds&#151;<BR>
Too bad it was a dream!</P>
is marked up these 3 ways on a browser:

High Flying

I gazed down into valleys,
At the snowcaps white as cream,
Then soared above the puffy clouds—
Too bad it was a dream!

High Flying

I gazed down into valleys,
At the snowcaps white as cream,
Then soared above the puffy clouds—
Too bad it was a dream!

High Flying

I gazed down into valleys,
At the snowcaps white as cream,
Then soared above the puffy clouds—
Too bad it was a dream!

Another way to isolate and even align an entire section of text is with the use of “division” tags:
  • <DIV>section of text</DIV>: defines the boundaries of a section of text and divides or separates that section from the rest of the text.  A line break automatically is inserted before and after a divided section. Note:  For the most part, <DIV> and </DIV> tags function like <P> and </P> tags, except that a line space is inserted before a <P> tag but not before a <DIV> tag, and a line space is inserted after a </P> tag but not after a </DIV> tag.
The <DIV> tag may contain within it an alignment parameter as part of the command:
  • ALIGN="LEFT"|"CENTER"|"RIGHT": positions the lines of the divided section at a specific location on the page.    "LEFT" (the default) aligns each line of text with the left margin of the page.
       "CENTER" centers each line of text horizontally on the page.
       "RIGHT" aligns each line of text with the right margin of the page.
       "JUSTIFY" aligns each line of text with both the left and right margins of the page, creating non-uniform spacing between words.
    Note:  Many browsers do not recognize the "JUSTIFY" value and treat it the same as a "LEFT" value.
The same poem used to demonstrate paragraph alignments is used to show divided section alignments: <DIV ALIGN="LEFT"><H3>High Flying</H3>
I gazed down into valleys,<BR>
At the snowcaps white as cream,<BR>
Then soared above the puffy clouds&#151;<BR>
Too bad it was a dream!</DIV>


<DIV ALIGN="CENTER"><H3>High Flying</H3>
I gazed down into valleys,<BR>
At the snowcaps white as cream,<BR>
Then soared above the puffy clouds&#151;<BR>
Too bad it was a dream!</DIV>


<DIV ALIGN="RIGHT"><H3>High Flying</H3>
I gazed down into valleys,<BR>
At the snowcaps white as cream,<BR>
Then soared above the puffy clouds&#151;<BR>
Too bad it was a dream!</DIV>
and is marked up these 3 ways on a browser:

High Flying

I gazed down into valleys,
At the snowcaps white as cream,
Then soared above the puffy clouds—
Too bad it was a dream!

High Flying

I gazed down into valleys,
At the snowcaps white as cream,
Then soared above the puffy clouds—
Too bad it was a dream!

High Flying

I gazed down into valleys,
At the snowcaps white as cream,
Then soared above the puffy clouds—
Too bad it was a dream!

Frequently, it is desirable to center text (such as headings, graphic images, tables, and other things) horizontally on a page.  Although the <P ALIGN="CENTER"> & </P> tags can be used to do this, it often is simpler and preferable to use “centering” tags:
  • <CENTER>text, graphic image, table, etc.</CENTER>: horizontally centers print and other objects on a page.  A line break automatically is inserted before and after anything surrounded by centering tags.
The top line of a web page with the following code:
<CENTER>
<IMG SRC="graphics/welcome.gif" ALIGN="ABSMIDDLE" WIDTH="279" HEIGHT="67"> <FONT SIZE=6 COLOR="#BAA21C"><B><FONT COLOR="#000000">to my</FONT> <FONT FACE="Lucida Handwriting, Times New Roman">Web Page!</B></FONT></FONT>
</CENTER>
would appear this way on a browser:
  to my Web Page!

On occasion, one may wish to create subscripts and superscripts in the text.  To do this, “subscript” and “superscript” tags may be used:
  • <SUB>number or character</SUB>: lowers a number or a character slightly below the midline level and reduces its font size by 1 degree.
  • <SUP>number or character</SUP>: elevates a number or a character slightly above the midline level and reduces its font size by 1 degree. Note:  Some browsers do not recognize <SUB> & </SUB> nor <SUP> & </SUP> tags.
This example in a source code of subscripted numbers and a superscripted section sign: The label on the brown bottle read as follows:<BR><BR>
<CENTER>SULFURIC ACID (H<SUB>2</SUB>SO<SUB>4</SUB>)<SUP>§</SUP><BR><BR>
<SUP>§</SUP>Highly Corrosive and Poisonous.<BR>
Handle with Extreme Caution.</CENTER>
would be displayed on a browser (which recognizes these tags) like this: The label on the brown bottle read as follows:

SULFURIC ACID (H2SO4)§

§Highly Corrosive and Poisonous.
Handle with Extreme Caution.

At times, it is too complicated and time-consuming to include the proper spacing and other formatting in the HTML source code text—for instance, when creating some charts or tables.  There is a way around this problem, though, and this is by using “preformatting” tags:
  • <PRE>text</PRE>: preformats text, preserving the spacing between the words and characters as typed in the source code.  The font of preformatted text, appearing on a browser, is a monospaced Courier font.  A line space automatically is inserted before and after preformatted text (that is, an entire line is skipped between the preformatted text and any text before and after it).
The convenience of preformatting tags is exchanged for the disadvantage of being limited to a monospace Courier font appearing on a browser.  Without preformatting tags (since a browser does not recognize line breaks, tabs, nor extra spaces), this table:
        NUMBERS 1-5 in VARIOUS LANGUAGES
   English  Español  Français  Italiano  Deutsch
1    one      uno       un        uno      eins
2    two      dos      deux       due      zwei
3   three    tres     trois       tre      drei
4   four    cuatro    quatre    quattro    vier
5   five     cinco     cinq      cinque    fünf
would be displayed on a browser like this: NUMBERS 1-5 in VARIOUS LANGUAGES English Español Français Italiano Deutsch 1 one uno un uno eins 2 two dos deux due zwei 3 three tres trois tre drei 4 four cuatro quatre quattro vier 5 five cinco cinq cinque fünf However, by using convenient preformatting tags: <PRE>   NUMBERS 1-5 in VARIOUS LANGUAGES
   English  Español  Français  Italiano  Deutsch
1    one      uno       un        uno      eins
2    two      dos      deux       due      zwei
3   three    tres     trois       tre      drei
4   four    cuatro    quatre    quattro    vier
5   five     cinco     cinq      cinque    fünf
</PRE>
the table is marked up by a browser into this readable form (although with a Courier font rather than a standard Times New Roman font):
        NUMBERS 1-5 in VARIOUS LANGUAGES
   English  Español  Français  Italiano  Deutsch
1    one      uno       un        uno      eins
2    two      dos      deux       due      zwei
3   three    tres     trois       tre      drei
4   four    cuatro    quatre    quattro    vier
5   five     cinco     cinq      cinque    fünf
Of course, there is a way to make the above table maintain a standard font and boldness and to cause the individual entries to be properly centered within their respective columns.  This will be covered in the example section of Tables.
When a lengthy quote or other section of text needs to be set apart from the rest of the text, “blockquote” tags may be used:
  • <BLOCKQUOTE>text</BLOCKQUOTE>: sets blocks of text apart from the main body of text.  The blocked text is indented on the right and on the left.  A line space automatically is inserted before and after blocked text (that is, an entire line is skipped between blocked text and any text before and after it).  Blockquoted text may be nested inside blockquoted text (one block inside of another block inside of another block).
The quotation in the following example:
JoAnne read to her husband and sister this quote by Ann Landers: "One out of four people in this country is mentally unbalanced. Think of your three closest friends...and if they seem okay, then you're the one." Thinking of the eccentric mutual friend who had just departed, all three had a good laugh. could be blocked off from the rest of the text in the source code like this: JoAnne read to her husband and sister this quote by Ann Landers: <BLOCKQUOTE>One out of four people in this country is mentally unbalanced. Think of your three closest friends...and if they seem okay, then you're the one.</BLOCKQUOTE> Thinking of the eccentric mutual friend who had just departed, all three had a good laugh. and would be displayed this way on a browser: JoAnne read to her husband and sister this quote by Ann Landers:
One out of four people in this country is mentally unbalanced. Think of your three closest friends...and if they seem okay, then you're the one.
Thinking of the eccentric mutual friend who had just departed, all three had a good laugh.
READ MORE - Text Modification Characters & Tags

Spacial Font Face Symbol Character

§To obtain a <Font Face="Symbol"> Character:
  1. Begin with <FONT FACE="SYMBOL">.
  2. Type the HTML code or the standard keyboard symbol from the table above.
  3. End with </FONT>.
READ MORE - Spacial Font Face Symbol Character

Special HTML Character

Character HTML
Code*
Character
Code
Description of Character   Character HTML
Code*
Character
Code
Description of Character
  &#09;   horizontal tab   Œ &#140;   capital OE ligature
  &#10;   line feed   ‘ &#145; &lsquo; left curly quote mark
  &#13;   carriage return   ’ &#146; &rsquo; right curly quote mark/apostrophe
  &#32;   space   “ &#147; &ldquo; left curly quote marks
! &#33;   exclamation point   ” &#148; &rdquo; right curly quote marks
" &#34; &quot; straight quote marks   • &#149; &bull; bullet
# &#35;   hash mark/number sign   – &#150; &ndash; “en” (short) dash
$ &#36;   dollar sign   — &#151; &mdash; “em” (long) dash
% &#37;   percent sign   ˜ &#152;   tilde
& &#38; &amp; ampersand   ™ &#153;   trademark
' &#39;   straight quote mark/apostrophe   š &#154;    
( &#40;   left parenthesis   › &#155;   right angle quote mark
) &#41;   right parenthesis   œ &#156;   small oe ligature
* &#42;   asterisk   Ÿ &#159;   capital Y, umlaut
+ &#43;   plus sign     &#160; &nbsp; non-breaking space
, &#44;   comma   ¡ &#161; &iexcl; inverted exclamation point
- &#45;   hyphen   ¢ &#162; &cent; cent sign
. &#46;   period/dot   £ &#163; &pound; pound sterling sign
/ &#47; &frasl; slash   ¤ &#164; &curren; general currency sign
0 &#48;   zero   ¥ &#165; &yen; yen sign
1 &#49;   one   ¦ &#166; &brvbar; broken vertical bar
&brkbar;
2 &#50;   two   § &#167; &sect; section sign
3 &#51;   three   ¨ &#168; &uml; umlaut/dieresis
&die;
4 &#52;   four   © &#169; &copy; copyright symbol
5 &#53;   five   ª &#170; &ordf; feminine ordinal
6 &#54;   six   « &#171; &laquo; left angle quote marks
7 &#55;   seven   ¬ &#172; &not; not sign
8 &#56;   eight   ­ &#173; &shy; soft hyphen
9 &#57;   nine   ® &#174; &reg; registered symbol
: &#58;   colon   ¯ &#175; &macr; macron accent
&hibar;
; &#59;   semi-colon   ° &#176; &deg; degree sign
< &#60; &lt; less than sign   ± &#177; &plusmn; plus or minus
= &#61;   equals sign   ² &#178; &sup2; superscript 2
> &#62; &gt; greater than sign   ³ &#179; &sup3; superscript 3
? &#63;   question mark   ´ &#180; &acute; acute accent
@ &#64;   commercial “at” sign   µ &#181; &micro; micro sign (Greek mu)
A &#65;   capital A   &#182; &para; paragraph sign
B &#66;   capital B   · &#183; &middot; middle dot
C &#67;   capital C   ¸ &#184; &cedil; cedilla
D &#68;   capital D   ¹ &#185; &sup1; superscript 1
E &#69;   capital E   º &#186; &ordm; masculine ordinal
F &#70;   capital F   » &#187; &raquo; right angle quote marks
G &#71;   capital G   ¼ &#188; &frac14; fraction one-fourth
H &#72;   capital H   ½ &#189; &frac12; fraction one-half
I &#73;   capital I   ¾ &#190; &frac34; fraction three-fourths
J &#74;   capital J   ¿ &#191; &iquest; inverted question mark
K &#75;   capital K   À &#192; &Agrave; capital A, grave accent
L &#76;   capital L   Á &#193; &Aacute; capital A, acute accent
M &#77;   capital M   Â &#194; &Acirc; capital A, circumflex accent
N &#78;   capital N   Ã &#195; &Atilde; capital A, tilde
O &#79;   capital O   Ä &#196; &Auml; capital A, umlaut/dieresis
P &#80;   capital P   Å &#197; &Aring; capital A, ring
Q &#81;   capital Q   Æ &#198; &Aelig; capital AE ligature, dipthong
R &#82;   capital R   Ç &#199; &Ccedil; capital C, cedilla
S &#83;   capital S   È &#200; &Egrave; capital E, grave accent
T &#84;   capital T   É &#201; &Eacute; capital E, acute accent
U &#85;   capital U   Ê &#202; &Ecicr; capital E, circumflex accent
V &#86;   capital V   Ë &#203; &Euml; capital E, umlaut/dieresis
W &#87;   capital W   Ì &#204; &Igrave; capital I, grave accent
X &#88;   capital X   Í &#205; &Iacute; capital I, acute accent
Y &#89;   capital Y   Î &#206; &Icirc; capital I, circumflex accent
Z &#90;   capital Z   Ï &#207; &Iuml; capital I, umlaut/dieresis mark
[ &#91;   left square bracket   Ð &#208; &ETH; capital Eth, Icelandic
&Dstrok;
\ &#92;   backslash   Ñ &#209; &Ntilde; capital N, tilde
] &#93;   right square bracket   Ò &#210; &Ograve; capital O, grave accent/null set
^ &#94;   caret   Ó &#211; &Oacute; capital O, acute accent
_ &#95;   underscore bar   Ô &#212; &Ocirc; capital O, circumflex accent
` &#96;   grave accent   Õ &#213; &Otilde; capital O, tilde
a &#97;   small a   Ö &#214; &Ouml; capital O, umlaut/dieresis mark
b &#98;   small b   × &#215; &times; multiplication sign
c &#99;   small c   Ø &#216; &Oslash; capital O, slash
d &#100;   small d   Ù &#217; &Ugrave; capital U, grave accent
e &#101;   small e   Ú &#218; &Uacute; capital U, acute accent
f &#102;   small f   Û &#219; &Ucirc; capital U, circumflex accent
g &#103;   small g   Ü &#220; &Uuml; capital U, umlaut/dieresis mark
h &#104;   small h   Ý &#221; &Yacute; capital Y, acute accent
i &#105;   small i   Þ &#222; &THORN; capital Thorn, Icelandic
j &#106;   small j   ß &#223; &szlig; small sz ligature, German
k &#107;   small k   à &#224; &agrave; small a, grave accent
l &#108;   small l   á &#225; &aacute; small a, acute accent
m &#109;   small m   â &#226; &acirc; small a, circumflex accent
n &#110;   small n   ã &#227; &atilde; small a, tilde
o &#111;   small o   ä &#228; &auml; small a, umlaut/dieresis mark
p &#112;   small p   å &#229; &aring; small a, ring
q &#113;   small q   æ &#230; &aelig; small ae ligature, dipthong
r &#114;   small r   ç &#231; &ccedil; small c, cedilla
s &#115;   small s   è &#232; &egrave; small e, grave accent
t &#116;   small t   é &#233; &eacute; small e, acute accent
u &#117;   small u   ê &#234; &ecirc; small e, circumflex accent
v &#118;   small v   ë &#235; &euml; small e, umlaut/dieresis mark
w &#119;   small w   ì &#236; &igrave; small i, grave accent
x &#120;   small x   í &#237; &iacute; small i, acute accent
y &#121;   small y   î &#238; &icirc; small i, circumflex accent
z &#122;   small z   ï &#239; &iuml; small i, umlaut/dieresis mark
{ &#123;   left curly brace   ð &#240; &eth; small eth, Icelandic
| &#124;   solid vertical bar   ñ &#241; &ntilde small n, tilde
} &#125;   right curly brace   ò &#242; &ograve; small o, grave accent
~ &#126;   tilde   ó &#243; &oacute; small o, acute accent
 &#127;   box   ô &#244; &ocirc; small o, circumflex accent
€ &#128; &euro; euro   õ &#245; &otilde; small o, tilde
‚ &#130;   comma   ö &#246; &ouml; small o, umlaut/dieresis mark
ƒ &#131;   florin   ÷ &#247; &divide; division sign
„ &#132;       ø &#248; &oslash; small o, slash/null set
… &#133;   ellipsis   ù &#249; &ugrave; small u, grave accent
† &#134; &dagger; dagger   ú &#250; &uacute; small u, acute accent
‡ &#135; &Dagger; double dagger   û &#251; &ucirc; small u, circumflex accent
ˆ &#136;   circumflex accent   ü &#252; &uuml; small u, umlaut,dieresis mark
‰ &#137; &permil; permil   ý &#253; &yacute; small y, acute accent
Š &#138;       þ &#254; &thorn; small thorn, Icelandic
‹ &#139;   left angle quote mark   ÿ &#255; &yuml; small y, umlaut/dieresis mark
READ MORE - Special HTML Character

Tuesday, 8 January 2013

Widget Cek lokasi dari No HP

Sesuai dengan judul posting, widget ini berfungsi untuk melacak lokasi dari no.handphone seseorang. Silahkan dicoba sob. Hasil pelacakan tidak selalu tepat. Bagi sobat yang mau pasang widget cek lokasi dari no.handphone ini bisa mengcopy script dibawah untuk dipasang di widget blognya.


Masukkan nomor handphone yang ingin di lacak lokasinya pada form dibawah ini. Hasil pelacakkan tidak 100% benar.

Supported by - Jefry
READ MORE - Widget Cek lokasi dari No HP

Thursday, 29 November 2012

10 CARA ALAMI MEMUTIHKAN KULIT BADAN DAN WAJAH


  1. Lada Manis (Paprika)
Paprika adalah salah satu bahan alami yang bagus untuk facial wajah Anda, dengan membuat masker dari olahan paprika Anda bisa memutihkan wajah Anda, dimana masker paprika ini bisa meningkatkan sirkulasi aliran darah di dalam wajah. Anda bisa menghancurkan (mem-blender) paprika merah atau hijau untuk menghasilkan pasta atau krim sebagai masker wajah. Oleskan pada wajah Anda dan kemudian biarkan selama lima belas menit, kemudian bersihkan wajah Anda dengan air dingin. Dengan krim alami ini sel-sel kulit wajah Anda dapat lebih sehat dan pastinya wajah putih alami bisa Anda dapatkan.

     2.Yogurt
Yogurt ternyata bisa memberikan kelambapan untuk kulit wajah Anda. Dengan mencampur sedikit madu dan kemudian oleskan pada kulit wajah Anda, biarkan selama 10 menit kemudian bisa dibersihkan dengan air. Masker berbahan yogurt ini bisa menghaluskan kulit wajah Anda, pastinya kulit wajah putih nan halus adalah dambaan semua orang.
      3.Chamomile
Chamomile memang biasa dijadikan teh. Namun bunga ini bisa berfungsi sebagai bahan alami untuk mencerahkan kulit wajah. Chamomile juga memiliki banyak kandungan untuk mengatasi mata yang bengkak. Anda hanya perlu mencelupkan kantong teh ke dalam air panas, dan biarkan sampai dingin. Kemudian, tempelkan kantong teh pada mata. Lakukan hal ini selama dua minggu untuk melihat hasilnya.
      4.Susu
Anda pasti sudah mendengar tentang manfaat mandi susu. Tetapi bila mandi susu dirasa terlalu repot, cukup gunakan susu untuk membasuh muka. Susu memiliki banyak bahan yang dapat mengurangi bintik-bintik hitam pada wajah, dan meningkatkan warna kulit dengan cara yang sempurna. Tuang beberapa tetes susu pada kain pencuci muka, lalu gunakan kain tersebut untuk menggosok wajah dengan lembut. Susu akan menghilangkan sel-sel kulit mati yang menutup wajah, dan memberikan warna yang baru.
 
      5. Minyak alpukat 

Banyak perempuan yang malas membersihkan wajah sebelum tidur, karena merasa sudah begitu lelah. Nah, minyak alpukat dapat membantu Anda yang tak sempat mencuci muka sebelum tidur. Minyak alpukat ini secara efektif membantu menghilangkan sisa-sisa riasan wajah. Setelah menghapus sisa make-up, gunakan tisu untuk menyerap kelebihan minyak yang tertinggal di wajah. 
      6.Jeruk nipis dan putih telur 
Putih telur sering disebut mampu mengencangkan kulit wajah. Untuk memperbaiki warna kulit, campurkan perasan jeruk nipis dengan putih telur. Gunakan bahan ini sebagai masker wajah. Oleskan masker jeruk dan putih telur ini ke wajah, lalu biarkan mengering sendiri. Setelah 5 10 menit, basuh muka Anda dengan air dingin. Hasilnya bisa Anda lihat setelah rutin melakukan hal ini paling tidak seminggu.

      7. Almond
Almond dapat membantu mengurangi kegelapan warna kulit, sehingga kulit akan terlihat lebih terang. Cara praktis dan alami untuk menggunakan almon untuk memutihkan kulit adalah dengan mencampurkan almon dengan susu dan sedikit kunyit. Caranya, pada pagi hari, rendam 4-5 biji almond dan satu ruas kunyit dalam susu cair. Pada malam harinya, keluarkan kunyit, lalu haluskan almon dalam susu tersebut hingga terbentuk pasta. Oleskan campuran ini pada wajah dan leher dan biarkan semalaman. Setelah itu, pada pagi harinya bilas dengan air dingin dan bersihkan. Untuk hasil yang optimal, lakukan cara ini 2 minggu sekali.
      8. Tomat 
 Tomat kaya akan vitamin C yang bermanfaat untuk memutihkan kulit. Banyak kosmetik pencerah kulit yang memakai ekstrak tomat sebagai bahan aktifnya. Nah, jika Anda ingin memakai tomat segar sebagai pemutih kulit, ambil tomat berukuran besar lalu parut. Tambahkan 2-3 tetes air perasan lemon dan beberapa tetes air mawar, aduk hingga rata. Oleskan pada wajah dan leher dengan kuas, diamkan selama 15 menit,lalu bilas. Lakukan cara ini setidaknya seminggu sekali
       9. Pepaya
 Pepaya yang berwarna hijau atau oranye dapat berkhasiat mencerahkan kulit. Pepaya hijau mengandung enzim papain yang ideal untuk memutihkan kulit. Caranya, ambil satu sendok makan pepaya hijau (pepaya yang masih mangkal) yang telah dihaluskan, dan satu sendok makan pepaya masak, campurkan. Oleskan pada wajah dan biarkan selama 15 menit, lalu bilas. Lakukan cara ini setiap hari untuk hasil yang optimal.
       10.Kentang
 Kentang ternyata dapat bermanfaat untuk memutihkan kulit, lho. Jus kentang dapat digunakan sebagai pemutih alami bagi kulit kita. Caranya, parut satu buah kentang dan tambahkan satu sendok teh madu, campur lalu oleskan pada kulit wajah dan leher. Diamkan selama 20 menit, lalu bilas dengan air. Ramuan ini cocok untuk semua jenis kulit.

Cara-cara di atas merupakan cara alami memutihkan kulit menggunakan bahan tradisional yang tentunya aman digunakan. Semoga dengan tips di atas, kulit anda dapat terlihat lebih putih dan cerah secara cepat. Selamat mencoba.
READ MORE - 10 CARA ALAMI MEMUTIHKAN KULIT BADAN DAN WAJAH

Monday, 6 August 2012

Kode-Kode Perintah CMD /Command Prompt


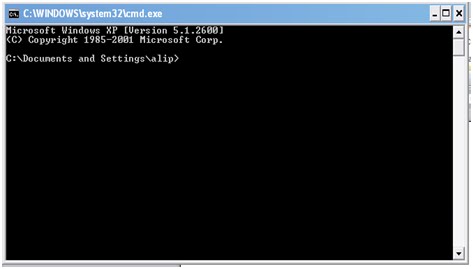
tahu kan cmd??? itu tuh layar hitam ngak jelas maksudnya apa yang ternyata memiliki banyak fungsi mulai dari hack meng hack dan lain -lain. tampilannya seperti di bawah ini.


udah tau kan gmana bentuknya??? utnuk memunculkannya masuk klik kiri star>run>n tuliskan cmd n enter maka akan muncul. cmd ini merupakan program bawaan windows yang memiliki banyak fungsi. untuk menjalankan fungsinya biasanya harus n mesti menggunakan kode-kode yang valid . seperti kode-kode di bawah ini:

  • ADDUSERS - Memasukkan/ menambah user ke/dari file CSV.
  • ARP - Address Resolution Protocol
  • ASSOC Change - file extension associations
  • ASSOCIAT - One step file association
  • AT Schedule - Perintah untuk membuat shedule program (utk dijalankan kemudian waktu)
  • ATTRIB - Mengganti atribut file
  • BOOTCFG - Edit boot setting windows
  • BROWSTAT - Mencari info domain,browser dan PDC
  • CACLS - Mengganti/mengubah file permissions
  • CALL - Memanggil sebuah program batch
  • CD - Memindahkan ke sebuah folder tertentu.
  • CHANGE - Mengubah Properties pada Terminal Server
  • CHKDSK - Memeriksa dan memperbaiki file system
  • CHKNTFS - Memeriksa NTFS file system
  • CHOICE - Menerima input keyboard ke dalam sebuah batch file
  • CIPHER - Encrypt-Decrypt files/folders
  • CleanMgr - Membersihkan secara otomatis Temporary files, recycle bin
  • CLEARMEM - Membersihkan memory
  • CLIP - meng-Copy STDIN ke Windows clipboard.
  • CLS - Membersihkan layar CMD
  • CLUSTER - Windows Clustering
  • CMD - Membuka layar CMD/ command prompt
  • COLOR - Mengganti warna pada window CMD
  • COMP - Membandingkan isi dari 2 atau lebih file
  • COMPACT - kompres file/folder di dalam partisi NTFS
  • COMPRESS - kompres file individu di dalam partisi NTFS
  • CON2PRT - Connect atau disconnect sebuah Printer
  • CONVERT - Convert FAT drive menjadi NTFS.
  • COPY - Copy 1 atau lebih file ke lokasi tertentu
  • CSVDE - Import/Export Active Directory data
  • DATE - Menampilkan/mengatur tanggal
  • Dcomcnfg - DCOM Configuration Utility
  • DEFRAG - Defragment hard drive
  • DEL - Menghapus 1 atau lebih file
  • DELPROF - Menghapus User Profile NT
  • DELTREE - Menghapus sebuah folder beserta subfolder
  • DevCon - Device Manager Command Line Utility
  • DIR - Menampilkan daftar file/folder dari sebuah drive
  • DIRUSE - Menampilkan disk usage/kapasitas disk
  • DISKCOMP - Membandingkan isi dari 2 buah floppy disk
  • DISKCOPY - Copy isi dari sebuah floppy disk ke floppy disk lainnya
  • DNSSTAT - DNS Statistics
  • DOSKEY - Mengedit command line,recall commands,dan create macros
  • DSADD - Menambah user (computer, group..) ke dalam active directory
  • DSQUERY - Menambah item ke dalam active directory
  • DSMOD - Modify user (computer, group..) di dalam active directory
  • ECHO - Menampilkan message pada monitor
  • ERASE - Menghapus satu atau lebih file
  • EXIT - keluar dari window CMD
  • EXPAND - Uncompress file
  • EXTRACT - Uncompress CAB files
  • FC - Membandingkan 2 buah file
  • FDISK - Disk Format dan partition
  • FIND - Mencari sebuah text string di dalam sebuah file
  • FINDSTR - Mencari strings di dalam files
  • FOR /F -Loop command: untuk beberapa files sekaligus
  • FOR - Loop command: all options Files, Directory, List
  • FORFILES - Batch process multiple files
  • FORMAT - Memformat sebuah disk
  • FREEDISK - Menampilkan free disk space (dalam bytes)
  • FSUTIL - File and Volume utilities
  • FTP - File Transfer Protocol
  • FTYPE - Menampilkan/mengubah file types yg digunakan dalam file extension
  • GLOBAL - Menampilkan daftar anggota dalam global groups
  • GOTO - Mengarahkan sebuah program batch untuk melompat ke labelled line
  • HELP - Online Help
  • HFNETCHK - Network Security Hotfix Checker
  • IF - Conditionally perform a command (perintah bersyarat)
  • IPCONFIG - Configure IP
  • KILL - Menghapus program dari memory
  • LABEL - Memberi/mengubah label disk
  • LOCAL - Menampilkan daftar anggota local groups
  • LOGEVENT - Menulis text ke dalam NT event viewer.
  • LOGOFF - Keluar dari system / Mengeluarkan user dari system
  • LOGTIME - mencatat tanggal dan waktu dalam sebuah file
  • MAPISEND - Mengirim e-mail dari command line
  • MEM - Menampilkan memory usage
  • MD - Create new folders
  • MODE - Configure a system device
  • MOUNTVOL - Mengatur Mount point dalam sebuah volume
  • MOVE - Memindahkan file dari sebuah folder ke folder lain
  • MOVEUSER - Menindahkan user dari sebuah domain ke domain lain
  • MSG - Mengirim message
  • MSIEXEC - Microsoft Windows Installer
  • MSINFO - Windows NT diagnostics
  • MSTSC - Terminal Server Connection (Remote Desktop Protocol)
  • MUNGE - Mencari dan Menganti text di dalam sebuah file (find & replace)
  • MV - Meng-copy file yang sedang/sementara digunakan
  • NET - Mengatur network resources
  • NETDOM - Domain Manager
  • NETSH - Configure network protocols
  • NETSVC - Command-line Service Controller
  • NBTSTAT - Menampilkan networking statistics (NetBIOS over TCP/IP)
  • NETSTAT - Menampilkan networking statistics (TCP/IP)
  • NOW - Menampilkan current Date and Time
  • NSLOOKUP - Name server lookup
  • NTBACKUP - Backup folders
  • NTRIGHTS - Edit user account rights (wilayah akses yg diizinkan oleh admin)
  • PATH - Menampilkan atau mengatur search path untuk executable files
  • PATHPING - Melacak route plus network latency dan packet loss
  • PAUSE - Menahan proses sebuah batch file and menampilkan message
  • PERMS - Menampilkan permissions (wilayah akses) user
  • PERFMON - Performance Monitor
  • PING - Menguji (test) network connection
  • POPD - Restore previous value dari sebuah directory yang di-save oleh PUSHD
  • PORTQRY - Menampilkan status ports dan service
  • PRINT - Print text file
  • PRNCNFG - Menampilkan, mengatur, atau mengubah nama printer
  • PRNMNGR - Menampilkan, menghapus, atau menambah daftar printer; set default printer
  • PROMPT - Mengubah command prompt
  • PsExec - Menjalankan proses jarak jauh (remote)
  • PsFile - Menunjukkan file2 yang dibuka dari jarak jauh
  • PsGetSid - Menampilkan SID sebuah computer atau user
  • PsInfo - Menampilkan informasi dari sebuah system
  • PsKill - Menghentikan proses melalui process ID
  • PsList - Menampilkan detail informasi dari sebuah proses
  • PsLoggedOn - Who's logged on (mengecek secara lokal atau melalui resource sharing)
  • PsLogList - Event log records
  • PsPasswd - Mengubah account password
  • PsService - Menampilkan dan mengubah services
  • PsShutdown - Shutdown atau reboot computer
  • PsSuspend - Suspend/menahan proces
  • PUSHD - Menyimpan/Save dan mengganti current directory
  • QGREP - Mencari kata/kalimat di dalam file yg sesuai dgn pola/line yg ditentukan.
  • RASDIAL - Mengatur RAS connections
  • RASPHONE - Mengatur RAS connections
  • RECOVER - Memulihkan/Recover damaged file dari sebuah disk defective (rusak).
  • REG - Membaca, mengatur, atau menghapus registry keys dan values
  • REGEDIT - Mengimport/mengeksport registry settings
  • REGSVR32 - Register/unregister file DLL atau ocx
  • REGINI - Mengubah Registry Permissions
  • REM - Merekam/mencatat comments (remarks) di dalam sebuah batch file
  • REN - mengubah nama file
  • REPLACE - Mengganti/Replace atau meng-update sebuah file dengan file line
  • RD - Delete folder
  • RDISK - Create Recovery Disk
  • RMTSHARE - Share folder atau printer
  • ROUTE - Memanipulasi network routing tables
  • RUNAS - Menjalankan sebuah program dgn menggunakan user account lain.
  • RUNDLL32 - Menjalankan sebuah DLL command (add/remove print connections)
  • SC - Service Control
  • SCHTASKS - Create or Edit Scheduled Tasks
  • SCLIST - Display NT Services
  • ScriptIt - Control GUI applications
  • SET - Display, set, atau remove environment variables
  • SETX - Set environment variables secara permanent
  • SHARE - Mendaftar atau edit sebuah file share atau print share
  • SHORTCUT - Create windows shortcut (.LNK file)
  • SHOWGRPS - Menampilkan daftar NT Workgroups atau user yang telah joined
  • SHOWMBRS - Menampilkan daftar Users yg merupakan member dari sebuah Workgroup
  • SHUTDOWN - Shutdown computer
  • SLEEP - Menunggu selama beberapa saat
  • SOON - Menjadwal(schedule) sebuah command untuk beberapa waktu kemudian
  • SORT - Sort input
  • START - membuka sebuah window baru, untuk menjalankan program atau command tertentu
  • SU - Switch User
  • SUBINACL - Edit file & folder Permissions, Ownership serta Domain
  • SUBST - Menyesuaikan sebuah path dengan drive letter
  • SYSTEMINFO - Menampilkan daftar system configuration
  • TASKLIST - Menampilkan daftar aplikasi dan service yang sedang berjalan
  • TIME - Menampilkan atau mengubah waktu pada system
  • TIMEOUT - Delay processing sebuah batch file
  • TITLE - Menentukan judul window untuk sebuah session CMD.EXE
  • TOUCH - mengubah timestamps sebuah file
  • TRACERT - Melacak route ke sebuah remote host
  • TREE - Tampilan grafis dari struktur folder
  • TYPE - Menampilkan isi dari sebuah text file
  • USRSTAT - Menampilkan daftar domain usernames dan last login
  • VER - Menampilkan version information
  • VERIFY - Memeriksa apakah files telah ter-save
  • VOL - Menampilkan disk label
  • WHERE - Mencari dan menampilkan files di dalam sebuah directory tree
  • WHOAMI - Menampilkan current UserName dan current domain
  • WINDIFF - Membandingkan isi dari dua atau lebih file.
  • WINMSD - Windows system diagnostics
  • WINMSDP - Windows system diagnostics II
  • WMIC - WMI Commands
  • XCACLS - Mengubah file permissions (hak akses)
  • XCOPY - Copy files dan folders
READ MORE - Kode-Kode Perintah CMD /Command Prompt

Sunday, 29 July 2012

Download file 4Shared tanpa ID

masukan link yang terdapat di file di 4shared, lau paste di kotak bawah ini, dan tekan Generate Link


READ MORE - Download file 4Shared tanpa ID

Thursday, 24 May 2012

Cabal Online Dungeon Guide – Forgotten Temple B1F

Here’s a guide on how to complete the Forgotten Temple B1F Dungeon or also known as FT B1F. A party is recommended to finish this dungeon because this dungeon is difficult to solo unless you have a high defense gear and is level 150+. Also its important to have a wizard with the party. Their Raise Spirit level 20 skill is needed because you and your party will be using Battle Modes with Battle Mode Aura when dealing with bosses and strong mobs.
Requirements: Muster Card: Forgotten Temple – B1F
FTB1Fentryitem
Duration: 50 min
Note: mobs won’t respawn in this dungeon after you killed them
And you should take 1m alz with you because later in the dungeon you need to buy a Forgotten Temple B1F Epaulet.
The Entrance of the dungeon is in Forgotten Ruin a level 95 area.
FTB1Fentryposition
Forgotten Temple B1F Dungeon Guide – Step by step:
1. Press on the hour glass to turn off the fire wall.
1
2. As you step up the stairs on the left there is a figure you can click on.
2
3. Keep going forward, you will meet a wall of fire that is blocking a bridge. Just wait until it goes down and pass by. Then keep moving forward until you cannot go forward anymore. Click on the monument on the left.
3
4. Keep moving forward. Press on this next monument.
4
5. This next part. If you have less than 1000 defense you should turn on BM+aura. You will need to break down the wall of fire while being shot at by monuments on the sides.
5
5a
6. After you destroy the wall of fire. Keep moving forward and kill the oblivion to continue with the quest. These mobs have high def and can melee/range; however, their attack rate aren’t that great.
6
7. After you kill all the oblivion. Go forward until you get to the next wall of fire. Click on the snake monument on the right to advance your quest and teleport in. Note: each member has to click on the right monument to teleport in. Don’t try to run pass the wall of fire it won’t happen.
7
8. In the next room, you have to kill the mini boss – Nesbite. At the same time in each corner of the room, there will be a Serpent that spawn. You will have about 5 seconds to kill the serpent, or it will activate the laser and most likely 1 hit you. The serpent spawn goes in clockwise manner. So you don’t have to guess where he will spawn next. If you are solo-ing you can drag the boss around clockwise. If you are in a party you can drag him or have 1-2 people work clockwise to kill the serpent.
8
9. After you kill the boss. Click on the altar in the middle of the room to open the way to the next hallway. Go forward and clear the hallway to get quest items.
9
10. Once you get to the end of the hallway look on the left side there is a beetle box. Break it to get the Mutant Record. Note: each member in the party needs one.
10
11. After you get your mutant record work your way backward. Talk to the monument on the 2nd picture to open a door. Talk to the researcher behind the door. Pay him 1 1m alz and get the Forgotten Temple B1F Epaulet +300 HP and +500 Defense.
11
11a
12. Once you get your Epaulet. Go back and into the room to kill all the mobs that will spawn (you need to click on the machine at the first screenshot, then they will appear). Occasionally click on the wall of fires to try to break them. Break them when you can.
12
12a
13. After you can go into the next room. Make sure you have at least 2 SP bars (if not 3). This next boss requires you to kill him in certain amount of time or he will fully regenerate. He will also turn on a shield occasionally. Once he turns on his shield, get off the platform to the stairs. Kill all the mobs that respawn at the stairs and then attack the boss again. Just keep doing that back and forth, and he should die. Furthermore, once his shield is turned on, the faster you kill the guards, the more time you will have to hit the boss before the shield goes back up.
13
Here’s possible position for people to stand while fighting the boss.
13a
14. After you kill the boss, take off the Purify Epaulette and use your A.C. Transmutter to break it to get a quest item. Talk to the stone behind where the boss stood to teleport you to the next room.
14
15. This long hallway has fire cannons that will shoot at you while you run by. With a defense of 800-900, they will hit you for about 200-300. If you need to, you might want to turn on BM and/or aura to run by. Once you get to the end of the hallway, you will need to break a wall of fire down to go into the next room (while being shot at by the cannons).
15
16. Once you get into the next room. Find a corner to get all of your party gather there. All those stone monuments mobs will spawn in different batch and just clear the room.
16
17. After the room is clear go into the next hallway and kill all the Groga.
17
18. Once you clear the Groga, you can enter the next hallway to the last boss’ room. Make you have enough SP (2 maybe 3) before going in. If you click on the statue on the Groga picture a timer will run and you have a certain time to come near the Fire wall befor the boss room..after some seconds the wall will open and you need to dash inside fast or it will be closed again and you need to destroy it. The last boss you have couple minutes to kill him. If you don’t kill him, he will disappear and a bunch of mobs will spawn. Once the boss respawn, the boss will get stronger. The boss will get stronger by each respawn.
18
19. After you kill the boss, there is an altar at the back of the room. When you click it the dungeon will be over and you will be teleported back out. Make sure you get ur chests (if u have picked up keys along the way). There are 3 possible keys (red, blue, green). Each key has a different series of box to click before you can open the chest room. The location of the chest room is between the Mutant Record and Researcher.
19

Key Quest
key
To start the hidden key quest you need to obtain one key.
There are 3 kinds of keys:
- Mutant Key Red
- Mutant Key Green
- Mutant Key Blue
Those keys are drops from monsters inside FT, every normal monster can drop it.
Sometimes no key will drop and sometimes you will get more than one (depend only on luck). The best way is to kill all monsters in the whole dungeon.
Now after you got a key you need to find the correct boxes.
You need to talk with 3 of them and then you get the Treasure key.
Mutant Key Red:
- First you need to click on the box which is at the beginning (Entrance).
- Next box is in the tunnel after the Nesbite room.
- Last box is in the Nesbite room.
Mutant Key Green:
- First box is in the tunnel after Chakris (second boss, the cat).
- Second box is befor you enter the room with the fire wall and those shooting
statues.
- Last box is in the room befor Chakris.
Mutant Key Blue:
- First box is in the tunnel befor the last boss room (After the Golem room).
- Second box is in the room befor Chakris.
- Last box is in the Golem room.
The Treasure Guardian (the room with your 4 chests) is in the tunnel between the Nesbite room and the Mutant Record Statue.
key2
Notes:
- You can only do one key per FT run.
- It is not important which key you take, drops will be the same.
- Easiest Key for solo runs is the red one because you must not kill Chakris for the
boxes.
Official confirmation from ESTsoft:
“In Forgotten Temple: Is there any difference between the red, green and blue key?
Red, green and blue key in Forgotten Temple B1F are the items to start quest. The only difference between red, green and blue key in Forgotten Temple B1F is the procedure of the quest. They all reward same drop rate and quest reward.”
Mutant Energy Ball
If you get a Mutant energy ball from a monster and you want to craft Mithril then you need to run back to the place where you picked up the Record of the Mutant.
Across from this point will be the hidden NPC.
Talk with him and give him his ball back and the wall on the left side will disappear.
Now you can walk inside and choose the card you want (slotted Mithril).
key3
Tip: Read the guide about Mithril Item Description.
Forgotten Temple B1F Map
FTmap
READ MORE - Cabal Online Dungeon Guide – Forgotten Temple B1F

[Dungeon Guide] Tower of the Dead (B2F) - Level 105

You need to have completed level 100 quest: Leveling Up
Being level 105
Have an Epaulette of the Dead (B2F) in your inventory
Have 2 hours free to kill without resting, that's the time that the dungeon lasts


Where's the entrance?


Tower of the Dead (B2F) Guide - Step by Step: NOTE: Remember getting all the items from all bosses, all the items are quest items.

1. Once you enter touch the tomb and click the only option.


2. Go forward and kill some Death Flower and some Zombies if you want. After touch the tomb and go forward again.


3. Directly go to the Death Flower Queen and kill her, for sure you'll get killed a lot of times, but you and your friends can kill her for sure. When you kill her the Death Fogs will dissapear for 15 minutes.


4. When you kill her, go forward to other one and do the same that you did with the first.


5. After killing it touch the tomb and go forward.


6. Go forward and avoid all the monsters until you reach the room in the image and kill every monter you see there, and Ekzane will appear.


7. When you kill him, touch the tomb in the image and Flame Emperor Zombie will appear.


8. Drag Flame Emperor Zombie where the image or if you're really strong kill him in the place he appears.


9. Get rid of the plant door before of after the boss, because that'll disturb you if you get killed and try to get back.


10. When you kill him, go forward to the sword in the floor and talk with it, the answers are in this order: 1 - 1 - 1 - 1 - 2 - 3 - 1


11. Go forward and touch the dead body: 1 - 2 - 1


12. Go forward, clean the rooms and touch the horn.


13. Get near the mirror and wait until the monsters come as it's magic. Now kill Arban Raikette.


14. Go forward and kill every monster that you don't like until you reach where I'm in the image.


15. Get near from the wall and Fellins Luerow will come, then kill him.


16. Now, go forward by the door and stay where I marked in the image and the monsters will come and you'll be without any danger, then clean as much as you can and then go to kill the boss, maybe you can without cleaning.


17. Go back a bit and touch the horn and... WARNING! Take your clock on, in a minute a Phantom Watcher will appear, and if you don't kill him in 5 seconds, a huge quantity of enemies will appear near Prinz Verzen to make your dungeon more difficult. Ger rid of him as soon as he appears.


18. Then get rid of Prinz Verzen.

19. Once you kill him, tell your mates to hide in another room while you're going to take care of ghost quest.


20. Go back a bit and touch these things, you and your friends will earn 100 honor points.


21. Once your friends are hidden, touch the tomb.


22. Enter to the corridor, touch the controller, you'll have to do the way that I marked in the image to let all the ghost out and noone in. Anyways remember once you activate the controller, the door will close soon, you'll have to go out of that corridor very fast and after break the door and you'll have to kill the Red, Green and Blue Ghosts while you drag all the other ghosts. Once all are out, run in and call your friends and touch the controller again.


23. Now you'll have to enter from the corridor to another corridor, then drag all the monsters to where I am in the image. Once you clean the room, or before if you don't hurry a lot of monsters will come from nowhere with Jumar Carbo, the boss.


24. Once you clean again the room kill Jumar Carbo.


25. Now, after kill Jumar Carbo, touch the tomb, answers are these: 1, 2, 3, 1.


26. Now you've got to clean the upper room like you cleaned the last room. Kill the monsters in the stairs, or if you feel confident enter when I mark in the next image.


27. Once you clean the room, or before if you don't hurry, be careful, Andreas and his friends will appear. Now drag Andreas downstairs if you can, or first clean the room again.


28. Once you kill him, break his chest and touch the well, the correct answers are these: 1, 1, 2, 1. Touch the torture device: 1, 1, 4, 1. For sure this is very helpful if you haven't cleaned the room. After go forward where I mark in the image.


29. Go ahead and you'll see a closed door, touch the controller and the door will open, go forward by the corridors and touch the next controller, and you'll gain 500 honor points, and your friends too.


30. Now kill all the monsters that you find and the door to the final boss will open.


31. Enter and kill the supposed final boss, but more monsters will appear when you kill him, you'll have to kill them where I indicated.


32. Once you kill them, a lot of monsters will appear. Kill them all, although there's an exception, drag Death Prime Knight out of the room.


33. Now you'll have to clean again the room, go back when you're ready to kill Death Prime Knight, and because of this I told you to drag it out, now you'll have to kill the replicas of the final boss. Only one of the replicas is real, maybe you're lucky and you kill one and the other dissapear.

Advise: Don't try to kill the 5 at the same time or you'll have serious problems...


34. Now two Death Prime Knights will appear, kill them and watch out with the final boss and with not being near of him while you're killing them, maybe he comes to kill you. After killing them get rid of the Final Boss.


35. After killing the Final Boss, touch the items in the order that I've put in the image.


READ MORE - [Dungeon Guide] Tower of the Dead (B2F) - Level 105

Comment Box